Did you know that on average a new sofa emits an eye-watering 90kg CO2 in production alone? If this sounds like a lot, that’s because it is; in fact, it’s the equivalent of burning through nearly 10 gallons of diesel!
Thankfully, there are plenty of eco-friendly alternatives to buying a brand-new sofa. One of these is getting old furniture reupholstered. When you reupholster a sofa, you not only reduce your carbon footprint but you also save much-loved furniture from being ditched.
If you have a sofa which needs a new lease of life, here you will find information about how we reupholster furniture at Plumbs.
Step 1: Inspection
Firstly, we inspect the visible sections of the furniture, such as the arms, backrest, sides, interiors, and cushions to determine what exactly needs to be reupholstered. We also check the hidden areas, such as under the seat cushions, as these are also subject to wear and tear.
While we work our way around your sofa, we feel the filling in the cushions; if they feel saggy, we select a high-quality sofa cushion foam to replace them later down the line. For advice on how to do this yourself, take a look at our How to Restuff Sofa Cushions post.
Next, we remove the layers of the upholstery down to their frame. This allows us to inspect each layer individually, so that we can see what we can reuse, what needs to be replaced, etc.
For the bottoming, we focus on any old tacks, staples and studs which are used to keep the frame in place. After these have been removed, we slide off the top cover. During this stage, we pay special attention to the frame, ensuring that it isn’t damaged at any point during disassembly.
Once the various pieces are disassembled we assess the quality of the padding and studding – if the padding is worn, or the frame needs attention, we replace or repair them. To ensure the foundation is ready for springing, any loose joints are tightened up or re-glued.
Step 2: Stripping the furniture
Comfortable sofas rely on robust, yet resilient, springs. As such, this is one of the most important stages of the reupholstery process.
To ensure a bouncy sofa, any worn or damaged springs are replaced during reupholstery, while those which are deemed adequate are aligned and tightened to the frame.
When it comes to adding new springs to the sofa, there are four types to choose from: double cone, tension, zig-zag and mesh top spring units. Take a look below to see how each type is fitted.
How to install double cone springs
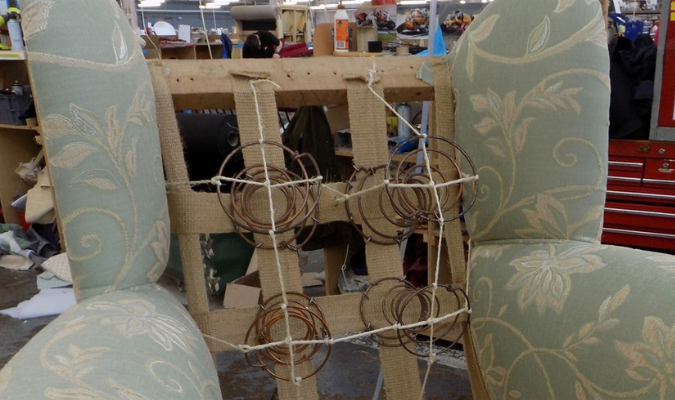
Double cone springs are usually placed in-between webbing and base hessian. Depending on their size and gauge they can be used for seats and backs, while those with the smallest and thinnest cone can be used to support arm pads.
The springs are then secured to the webbing, frame and other springs with lashing. To finish off the base – and for structural integrity – they are covered with a layer of hessian.
How to install tension and zig-zag springs
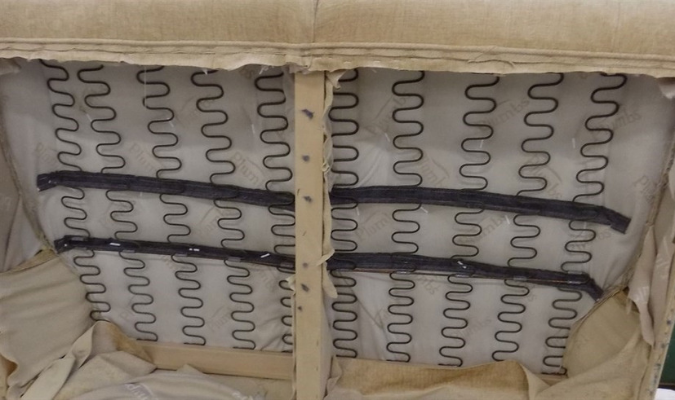
Used mainly for modern pieces of furniture, tension/zig-zag springs require much less effort to install than double cone springs. Where double cones must be secured to various areas of the base, tension/zig-zags can be secured to the frame using only hooks. Simply set the zig-zag ends into the wood frame to secure your base.
How to install mesh top spring units
A popular option for commercial furniture, mesh top spring units use a single-cone spring to rivet to the base of thin steel laths. These are then held in an upright position by a wire mesh with a heavier wire around the edge. This is then covered with a layer of hessian.
Step 4: Webbing
Webbing the frame is next. To do this, we look at the functional foundation where cushions are usually placed (if you’ve ever bought outdoor furniture, the webbing is often exposed as bands of plastic or rubber across the frame).
We then make sure the webbing is both flexible and strong enough to provide suspension to the sitter. We also add or replace any springs, stuffing, padding or deep buttoning, to increase comfort and enhance the overall shape of your furniture.
Step 5: Attaching

Once all the fabric is measured and cut, we apply the top cover to your furniture. To do this, we drape the fabric over the armrest and smooth it down until the seams match up. Then, we tuck the ends in until they fit around their section and fasten in a straight line.
After this, we cut out any seat pads which need remoulding. Using the measurements taken at the beginning, we cut out the cushion shape from foam and then cover with stuffing and padding.
We attach the rest of the sections, paying special attention to the tautness of seat cushions, as these are the most prone to sagging over time. This allows us to fit all the pieces back together. Once this has been completed, we send your reupholstered sofa back to you, so that you can enjoy it for many years to come.
To view our reupholstery services, take a look at the Plumbs website or view our reupholstery videos for more details about what we do.
Please note, as we are experts at reupholstering furniture, we do not recommend doing it yourself at home. The process is highly complex and requires a trained reupholsterer to achieve a professional, long-lasting look.